

When you’re in the thick of a cancer journey, there’s a specific kind of exhaustion that words don’t quite capture. It isn’t just “being tired”: it’s a deep, cellular drain that makes you feel like your internal battery is corroded. Early on, I realized that my body felt like a “low oxygen” environment. If cancer thrives in anaerobic (low oxygen) conditions, I decided I was going to do the exact opposite. I wanted to flood my system with the good stuff.
Ozone therapy became my way of flipping the light switch back on. Before I started home ozone therapy for cancer support, I felt like I was walking through molasses. After incorporating it into my daily cancer recovery program, that fog started to lift. It wasn’t an overnight miracle, but it was a tangible shift in my energy and clarity.
Today, I want to walk you through how I use ozone insufflation at home. It sounds a bit technical: and okay, the administration method is a little “out there” for most people: but once you get past the initial learning curve, it’s one of the most powerful tools in my essential cancer toolkit
Why Ozone? (The Power of Oxygen)
The logic is pretty simple: healthy cells love oxygen. Ozone (O3) is basically “supercharged” oxygen. While the air we breathe is O2, that extra atom in ozone makes it highly reactive in a way that stimulates the body’s own healing mechanisms. It’s like giving your immune system a morning espresso.
When I first looked into oxygen therapy at home, I was overwhelmed by the options. But after doing my homework, I landed on ozone insufflation as the most effective, budget-friendly way to get systemic benefits without needing a clinical setting every single day.
My Ozone Setup
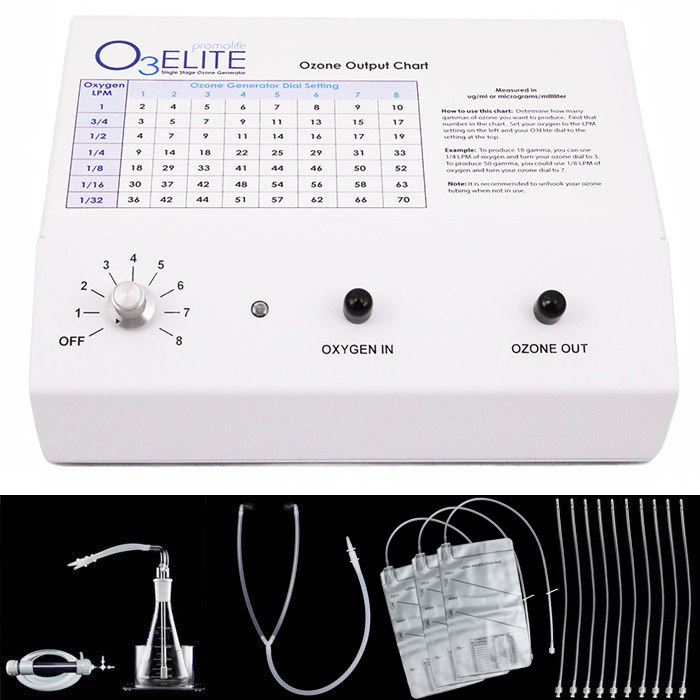
I didn’t want to mess around with low-quality machines. If I was putting this into my body, I wanted medical-grade equipment. I went with the Ozone Insufflation Kit from Promolife and the Elite single machine.
This particular kit is great because it comes with everything you need to hit the ground running. Buying it as a bundle saved me a lot of head-scratching and a decent amount of money. It’s a solid investment in your health that pays for itself when you consider the cost of out-of-pocket clinical treatments.
Quick word about oxygen tanks
Here is a mistake I almost made: you cannot use ambient air with these machines. Air is only about 20% oxygen; the rest is nitrogen. If you run regular air through an ozonator, you end up with nitrogen byproducts you definitely don’t want. You need a pure oxygen source.
I use medical-grade oxygen. If your oxygen saturation levels are 88% or lower, insurance usually covers the cost of the tank and refills. If not, you’ll have to pay out of pocket, but it’s surprisingly affordable. I was able to get an “E-Tank” (also called an 870 tank) for about $21. Since I only use it for a few minutes a day, one tank lasts a long time. You can buy bottles with your kit which you can then refil locally – worth it!
Pro tip: You want an actual tank, not an oxygen concentrator machine. Most home concentrators don’t provide the purity or the specific flow rate needed for medical ozone. If you can’t get a prescription for medical grade, look for industrial 540 oxygen tanks at local suppliers: it’s essentially the same gas, just a different tank fitting.
Ozone water
Before I dive into the insufflation part, let’s talk about ozone water. This is the easiest way to start. It’s a simple, effective way to get higher levels of oxygen into your bloodstream and down into your cells.
I fill a glass with cold distilled or spring water, drop the ozone dispenser in, and let it run for 15 minutes. Once it’s done, I drink it immediately. I started with one glass a day and worked my way up to three. It feels incredibly refreshing, almost like drinking water from a mountain stream right after a lightning storm. It’s a great companion to my mineral healing broth when I’m focusing on deep nourishment.
For a complete list of ways you can use ozone, I recommend the following excellent and very complete article by Dr. Frank Shallenberger: https://www.faim.org/how-to-use-ozone-to-treat-almost-any-illness-in-your-own-home
The Prep: Why I Do a Coffee Enema First
Before I perform the actual insufflation, I almost always do a coffee enema. I know, it sounds like a lot of “bathroom time,” but hear me out.
The goal of ozone insufflation is for the gas to be absorbed through the intestinal wall. If your colon is full, the ozone can’t reach the lining as effectively. Plus, coffee enemas are incredible for liver detox. By clearing the path first, I’m making sure the ozone has a “clean slate” to work with. If you’re curious about how that works, check out my guide on how to do a coffee enema. It’s the perfect one-two punch for detoxification and oxygenation.
How I Do Ozone Insufflation (Step-by-Step)
“Insufflation” is just a fancy word for introducing the gas into a body cavity. For systemic healing, rectal insufflation is the gold standard because the walls of the colon absorb the ozone directly into the portal vein system.
I will share here a great little video made by promolife. It explains the benefits of ozone insufflation as well as how to perform the simple procedure. Written details are also available below the video. Enjoy.
Here is the routine I follow, based on the protocols from Dr. Frank Shallenberger, who is basically the godfather of ozone therapy in the US.
- Fill the bag: I fill my multi-chamber bag with the desired amount of ozone from the machine.
- Get comfortable: I lie down on my right side. This position helps the gas move through the natural curve of the colon.
- The setup: I attach a fresh catheter to the bag and lubricate the tip with a little bit of organic olive oil.
- Insertion: I insert the catheter about four inches. Then, I slowly press the bag to inject the ozone. Slow is the key here: you don’t want to rush it.
- The hold: I try to retain the gas for at least a minute, though usually, your body absorbs it very quickly.
It sounds intimidating the first time, but it’s actually very quick. The whole process takes me less than five minutes.
Finding the Right Dose (Gamma and Volume)
You don’t want to go full-throttle on day one. Your body needs to get used to the “ozonides” (the compounds created when ozone hits your tissues). I started low and slow.
- Week 1: 100 cc volume at 15-20 gamma.
- Week 2: Increase to 30-35 gamma.
- Week 3: Increase to 40-45 gamma.
- The Goal: Eventually, I worked up to 200 cc volume at 40-45 gamma.
If I ever felt any cramping or “bubbling” discomfort, I just backed off the volume a bit. Listening to your body is the most important part of any alternative cancer treatment.
Fitting Ozone Into Your Life
I recommend making this a daily habit during your active recovery phase. Once I felt my health had fully returned and my energy was stable, I moved to a “maintenance” schedule of about three times per week.
Ozone is just one piece of the puzzle. It works alongside my daily supplements and my ritual of brewing Taheebo tea. While the tea works on the blood and the immune system from one angle, the ozone attacks the problem with pure oxygen from another
Final Thoughts
Taking control of your own healing can feel like a full-time job. Some days you’ll feel like a scientist in your own bathroom, surrounded by oxygen tanks and glass beakers. But there is a massive amount of empowerment that comes from saying, “I am going to change the environment of my body.”
If you’re feeling stuck, tired, or just looking for that next “hack” to boost your recovery, I can’t recommend home ozone therapy enough. It’s been a literal breath of fresh air for my journey.
If you have questions about the setup or how it feels, don’t hesitate to reach out. We’re all in this together, figuring out what works, one step at a time.
Julien